Home » Pinterest

Tag: Pinterest

Five Tips to Polish Your Presence on Pinterest

Five Tips to Polish your Presence on Pinterest

Pinterest has made several changes over the last year. If you’re on Pinterest, it’s worth taking a little time to polish your profile

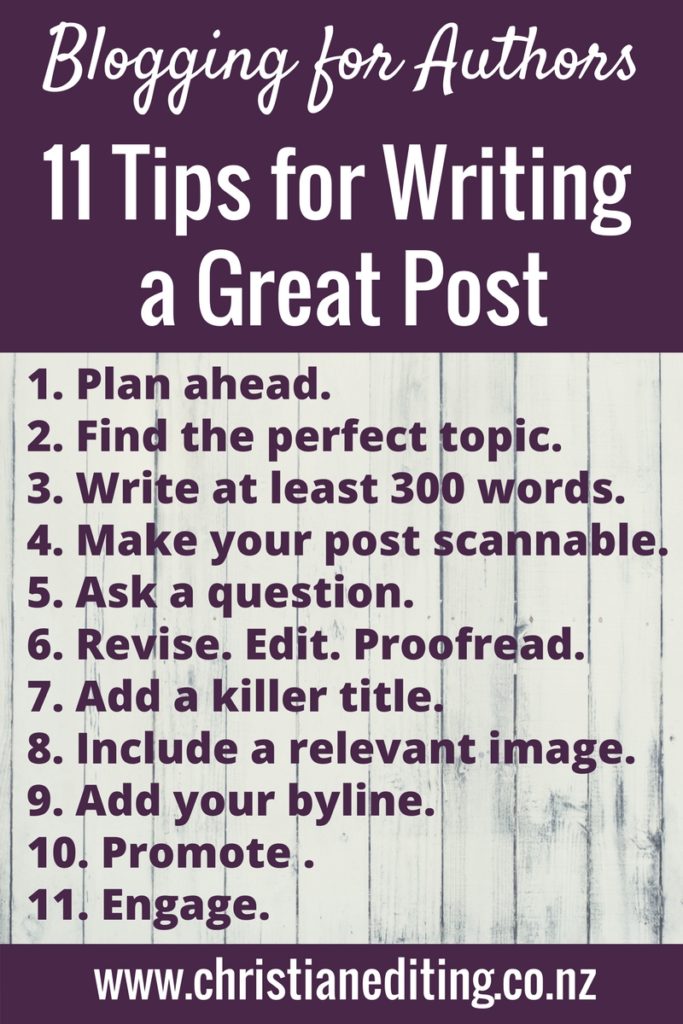
Today I’m sharing four tips to polish your presence on Pinterest, and one tip for pinning:

  • Choose your Profile Cover
  • Add a Board Cover Photo
  • Sort your Boards
  • Section your Boards
  • Use hashtags

1. Choose Your Profile Cover

Pinterest have introduced a profile cover photo. But this isn’t the same header image or cover photo as on Facebook or Twitter—you can’t design and upload your own image. Instead, Pinterest forces you to choose from three options:

Latest Pins

The most recent Pins saved to your profile, whether you’re pinning your own pins or other people’s pins. The advantage of this option is it is current. The disadvantage is that what you pin might be personal, not around your author brand. Do you want your Profile Cover to display your Pins and your books, or  recipes for cauliflower pizza and obscure Dr Who memes?

Recent Activity

Pins people saved from your site and linked accounts. This shows which of your pins are the most popular, which implies some of your pins are popular enough that other people are saving and sharing them. My Pinterest analytics say this is the case, but my Recent Activity cover doesn’t share the same message …

Not too sure what happened with this one!

Pick a Board

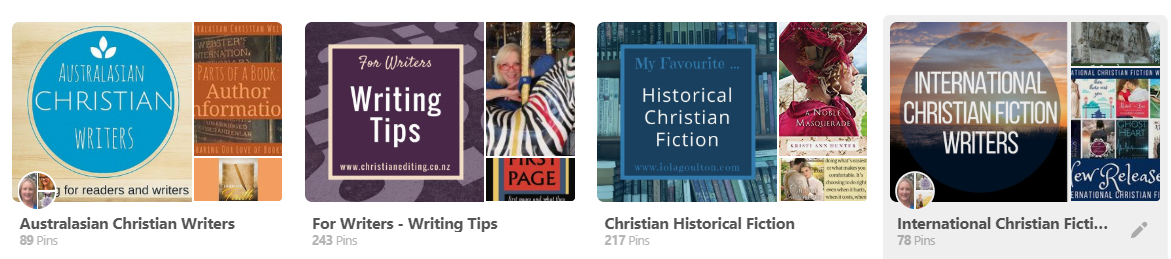
I think this is the best option. For published authors, pick a board that includes all your book covers. For unpublished authors, pick something that’s consistent with your author brand, and interesting or inspirational (not the cauliflower pizza). Don’t pick a group board or something like writing tips unless that reflects your author brand and target market.

I share about reading and writing on Pinterest (that’s one of the beauties of Boards: people can choose to follow only the Boards they are interested in). I went through several Boards trying to decide which to use. Did I want to use a group board (no), a board about writing (no), or a board about reading (yes).

I eventually settled on using my Favourite Quotes board, as that highlights great lines from some of the books I’ve read. It does (unfortunately) include one quote three times, but hopefully that will change as I add more quotes to the board.

Pinterest Profile Cover

Action Point

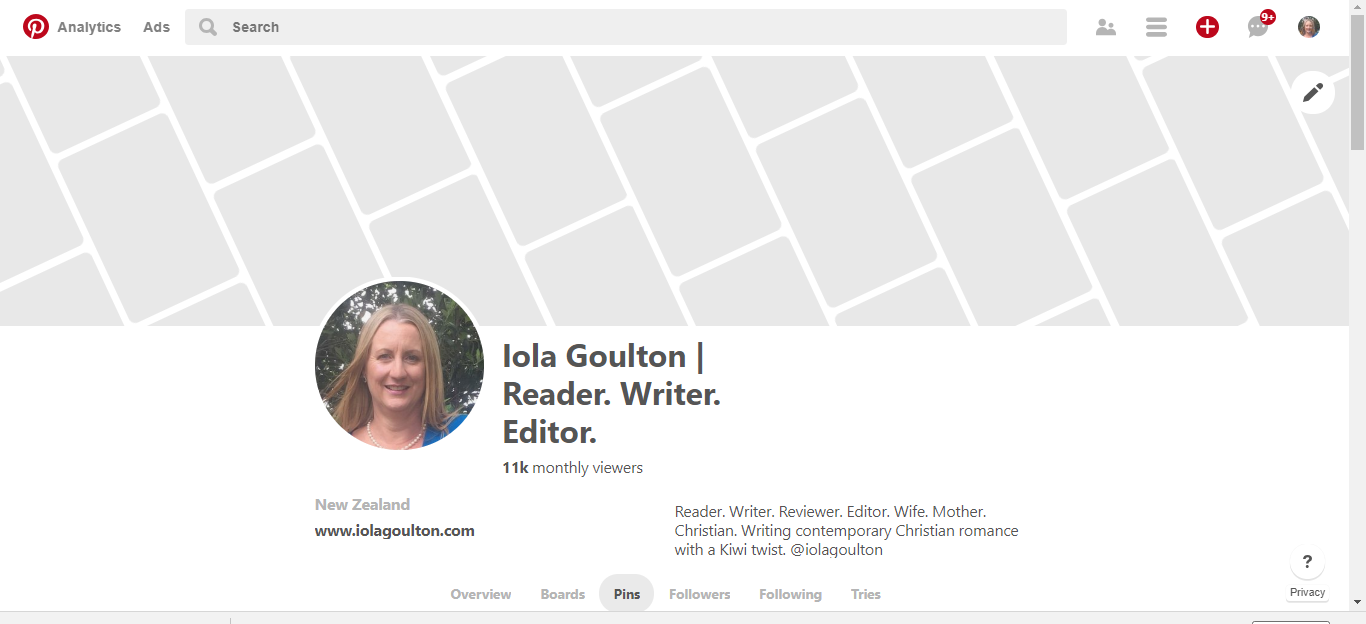
Head over to Pinterest, go to your Profile, and click on the grey pencil (top right-hand corner) to choose your preferred Profile Cover.

2. Add a Board Cover Photo

Did you know you can choose which Pin shows as the cover on each of your Boards? This gives you another opportunity to reinforce your author brand visually … and to give your Pinterest visitors a clear picture of what they can expect to find on your Board.

Board Cover Photos on Pinterest

While Pinterest prefers vertical images as a rule, your Board Cover Pin should be square, as that is how it is displayed on desktop and mobile. My Board Cover Pins are 800 x 800 pixels, and I created them in Canva.

To Create your Cover Photo

  • Create a branded image in Canva.
  • Go into Pinterest.
  • Click the red + button at the top right-hand side of the page.
  • Select Upload Image.
  • Upload your branded image.
  • Add the URL of the relevant page on your website.
  • Add a description of the Pin (this could be the same as your Board description).
  • Click Done.
  • Go to your Boards page.
  • Click the grey pencil at the bottom of the relevant Board to Edit your Board
  • Click Change cover.
  • Select your branded Pin.
  • Save Changes.
  • Repeat for each Board you want to brand.

Action Point

Create and Pin branded Cover Photos for your author boards.

3. Sort Your Boards

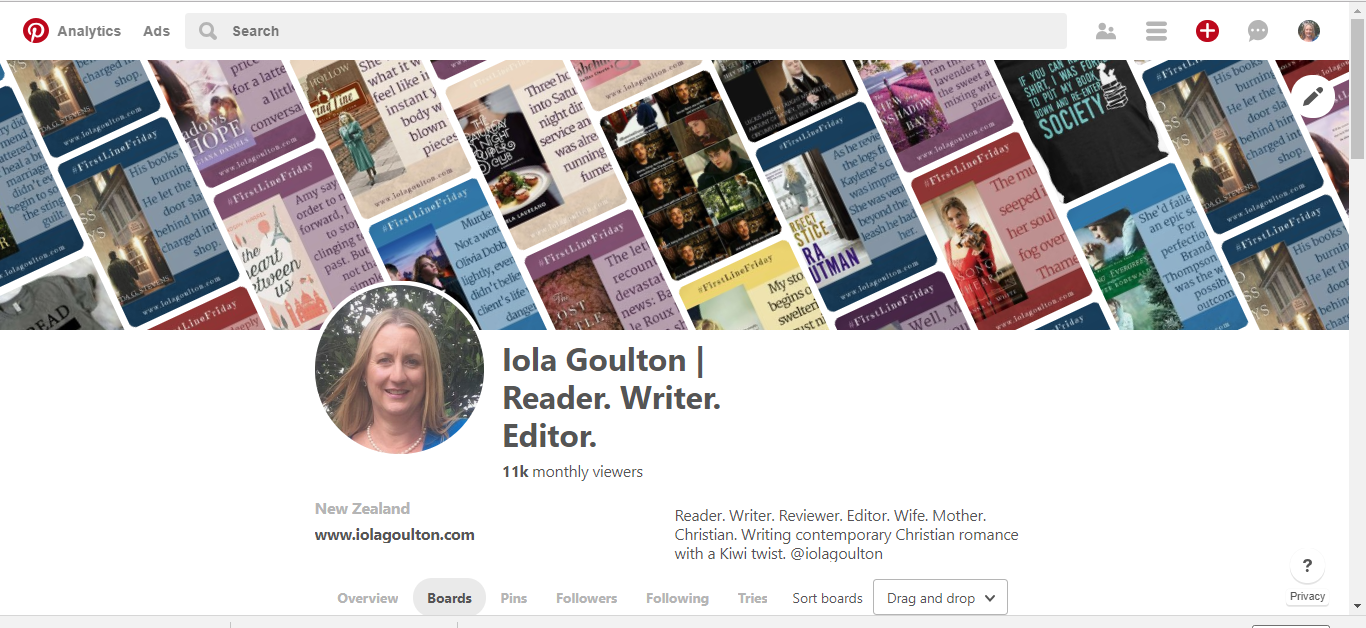
In case you didn’t know, you can also sort your boards. This is a good idea, as it means you can position your branded boards at the top to promote and reinforce your visual brand. If you don’t sort your boards, then Pinterest will choose how they display the Boards (Last saved to, A to Z, Newest, or Oldest). This might not be the image you want to send …

  • Go to Pinterest.
  • Display Boards.
  • Go to the Sort Boards menu to the right, and select Drag and Drop.
  • Drag your Boards into the order you want. Start with the Board you want at the top, and work across, then down.

Action Point

Sort your Boards to reinforce your author brand by placing your most important Boards at the top of your page (but without looking entirely self-promotional).

4. Section Your Boards

You can now section (aka segment) Boards within Pinterest. This is a great idea, as it means you don’t have to have a gazillion separate boards. Instead, you can have one board for a topic (e.g. Food), then divide that board into appropriate sections (e.g. breakfast, lunch, keto, chocolate).

Illustration of Pinterest Board sections

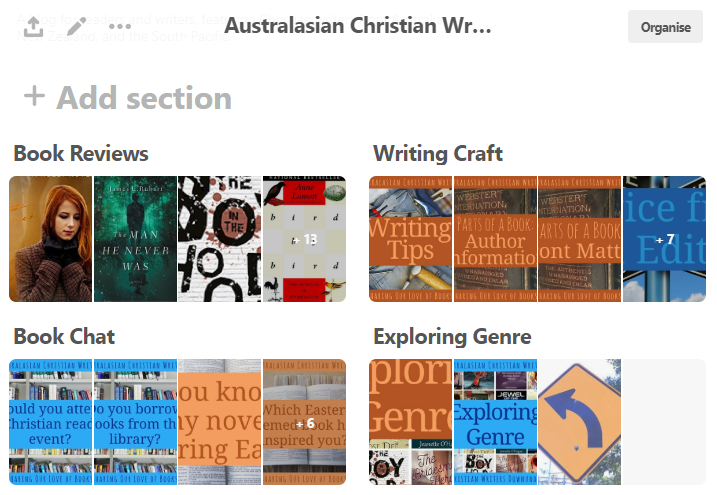
This is also great for authors, as it means you don’t have to have separate Boards for each book (which can look self-promotional and self-indulgent). Instead, have one Board for each series, with individual Pins sectioned by book.

How to Section a Board

  • Click into a specific Board.
  • Click Add Section.
  • Click Organise (at the top right-hand corner).
  • Select the Pins you want to move. Click Move.
  • Hover over the Section you want to move the Pins to until you see “Move X Pins here”.
  • Click.

This means you can combine and eliminate small Boards … which is good Pinterest practice anyway. To combine Boards, go to your Boards page, click Organise (at the top right-hand corner), and move Pins from their current Board into the appropriate Section of your new Board. You should have a minimum of five Pins on each Board (and ideally at least twenty).

For more information, see this post from the Pinterest blog: Organise Your Ideas on Pinterest.

Action Point

Section your larger boards to make them easier to navigate.

Tidy up your Pinterest account by combining and sectioning some of your smaller Boards.

5. Use Hashtags

In September 2017, Pinterest official announced that they would now support hashtags in the same way as Twitter and other popular social media apps. The principles are the same: choose relevant hashtags people are likely to search. Twitter suggest using no more than twenty hashtags on a single pin, but other Pinterest experts suggest four (as using too many hashtags looks spammy).

Action Point

Add up to four hashtags to each Pin (e.g. the hashtags you’re using when you post to Twitter or Instagram).

And If You’re Not on Pinterest …

If you’re not in Pinterest, perhaps you should be! Pip Reid, Kiwi author and co-owner of Bible Pathway Adventures, has collaborated with Mark Dawson of Self-Publishing Formula to write a short introduction to Pinterest. It’s available free from Amazon: Pinterest for Authors.


What tips do you have for using Pinterest?

Blogging for Authors: 11 Tips for Writing a Great Post

Blogging for Authors | 11 Tips for Writing a Great Post

Marketing. It’s the part of writing and publishing that authors enjoy least (well, most authors). But marketing is a necessary evil no matter whether you are trade published or self published. And a solid author platform—including a website and maybe a blog—is the foundation of good author marketing.

If even the thought of establishing an author platform fills you with dread … I can help. Click here to sign up to be notified about my March Marketing Challenge: Kick Start Your Author Platform.

But today I’m here to share about blogging for authors: my top 11 tips for writing a great blog post.

1. Plan Ahead

Yes, I know this sounds boring. But it will cut down on your blogging stress in two ways because it means you won’t be scrambling to write and edit a blog post at the last minute. Planning ahead also means you can write when the urge hits you … even if that’s several weeks ahead of your scheduled post date. As an example, I’m drafting this post on 22 November. I know December is going to be busy, so I’m trying to get ahead while I can.

It gives me a good feeling to check the calendar on Monday morning and find all the posts are scheduled for the week. All I have to do is promote them (see point 10 below).

2. Find the Perfect Topic

Sometimes you’re writing a blog post with a specific goal in mind: to share a cover reveal, a pre-order, a new release, or a specific time-sensitive promotion. These are easy posts to plan and write ahead of schedule, and should be part of your regular book launch marketing plan.

Sometimes you’re writing a post that has to fit a particular theme.

But more often you’re faced with a blank slate. I find those blank slate posts harder to write than when I’ve got a topic in mind. So … plan ahead. Plan out what topics you’d like to cover and when. Then you can write to cover those topics, or (if the muse hits you) you can write to please the muse.

What makes a great blog post topic? I suggest choosing topics that:

  • Interest you (so you’re going to enjoy writing it)
  • Are not going to date quickly (so you can continue to promote the post in the future).
  • Are relevant to your target audience. You do know your target audience, right? Do they ever ask questions? Yes? Then write an answer. You’re likely to get the same questions over and over, and having the answer in a blog post means you can direct future askers to the post.

(Kick Start Your Author Platform has more great tips on choosing the perfect post topic.)

3. Write at least 300 words

One of our objectives as writers is to be read. Which means writing words people want to read. But first people have to find what you’ve written. This means making your blog post as appealing to Google (and other search engines) as it is to your target reader.

Which means writing a blog post that’s at least 300 words long. More words are better, but only if they are good words. No padding!

(P.S. In a group blog, that’s 300 or more words of content. Not 300 words including your bio.)

4. Make Your Post Scannable

As you write, make your post scannable. Many people read blog posts via a reader (such as Feedly), or on a mobile or tablet.

In an online world, scannable equals readable.

To make your blog post scannable, use:

  • Short paragraphs (no more than four lines).
  • Headings and subheadings.
  • Bullet points or lists where relevant. Like here.

11 Tips for Writing a Great Blog Post

5. Ask a Question

As bloggers, we need to engage our readers, to keep them coming back. A great way of doing this is to ask a question.

This could be like my Bookish Question, or like #FirstLineFriday posts (what’s the first line of the book nearest you?).

Or you could ask a question that’s relevant to theme of your post. If the post is sharing your favourite novels, ask your readers their favourite novels. If you’re about Christmas, ask your readers to share their favourite Christmas memory. You get the idea.

The blogs I enjoy reading most are generally conversations where the comments are as important as the blog itself. So work out how you can turn your blog post into a conversation.

6. Revise. Edit. Proofread

We’re writers. We can do this. (If you can’t, Christian Editing Services can help you!)

7. Add a Killer Title

Feedly delivers me over 100 blog posts every single day. I don’t have time to read 100 blog posts. No one does. So how do I decide which posts to read? Based on the title.

Some people don’t want to use clickbaity titles such as 11 Tips for Writing a Great Blog Post. However, it’s only clickbaity if the post doesn’t actually deliver on the promise (or makes you click through 32 screens to get the 11 points).

Also, I’m reliably informed (thanks, Margie Lawson) that people subconsciously like numbered posts, because the numbers show us how much longer until the end of the post (not long now, people).

 8. Include a Relevant Image

People like images. Search engines like images. Social media likes images—experts will tell you posts with images get more attention.

Include images. (But make sure you are using them legally.)

Your main image should be centred at the very top of the post. This is the image Blogger will pick up for social media shares (if you use WordPress, you can select a Featured Image. WordPress will display that at the top of your post, and use it for social media shares).

Intersperse images throughout a longer post—it breaks up the text and makes it more readable.
 Use design software such as Canva to brand your images, so your images stand out to someone randomly scanning through Feedly. And include your killer title with your image—that will help when you’re sharing to visual sites like Instagram and Pinterest (see 10, below).

If you’re posting on a group blog like ACW, include your author photo, bio, and social media links at the bottom of the post.

9. Add Your Byline

Tell your readers who wrote the post. This is especially important if you’re writing for a group blog with multiple contributors. Some people will choose to read the post because you wrote it. Make it easy for them to know they want to read this post.

10. Promote Promote Promote

Note: promote promote promote does not mean spam spam spam.

Promoting means sharing your post with your target audience using relevant social networks.

If your post is about your multi-author romance giveaway, share in places where romance readers congregate (hint: not LinkedIn).

I use Buffer to share to Facebook, Google+, Instagram, Pinterest, and Twitter—Buffer’s Power Scheduler means I can even schedule multiple posts at once. A few clicks, and it’s done, with a unique message for each network (e.g. one or two #hashtags on Twitter, but more on Instagram).

Why these networks?

  • For my reader-writer-reviewer posts, my target reader is on Facebook, Instagram, and Pinterest. Many are also on Twitter, and it takes only a few extra seconds to get Buffer to share to Twitter as well.
  • For my writer-editor posts, my target audience is on Facebook, Pinterest, and Twitter. The beauty of Pinterest is that people can follow specific Boards, so people who aren’t interested in writing can choose not to follow my writing-related Boards.

I share on Google+ because that is indexed for SEO purposes. Translated: sharing to Google+ means Google is more likely to show my blog post (or Google+ share) to someone who is searching for posts on my topic.

The other reason for sharing or promoting is that some blog posts get more traction on social media than on the actual blog. For example, my weekly Bookish Question often gets no comments on the actual blog post, but always gets Likes and Comments on Facebook and Instagram (especially Instagram).

11. Engage

You finished your blog post with a question, right? Now it’s important to check back and make sure you respond to answers (and other comments). And don’t forget to check your social media networks and respond to comments there as well.

Readers want to connect, to engage. That means responding to comments in a timely manner.

That’s it. My top blogging tips. Is there anything you don’t understand or you’d like more information on? Or anything you’d like to add? Let me know in the comments.